Sunday, January 27, 2013

2 Minute Moment Project #1


This is my first attempt at creating a video.  I used a video of an ignite presentation my students and I gave in August and re-edited it to describe a compelling experience.

How do you make public speaking compelling and interesting?

The video starts out like just another talk at any professional development type conference.  You start out by thinking O.K. here is just another story.  I hope that in the second part of video it becomes more compelling as I talk from the heart about my students experience in Palau last spring.


Once again the subject is public speaking.  I feel that my students should be able to present their ideas in public.  Giving a presentation in class is one thing.  But to have to speak in front of a group of adults and make them listen is something completely different.

Having a real audience and talking about something that you have experienced and care deeply about helps to make the experience more compelling for both the audience and the speakers.

Over the last year my students have given over 25 presentations outside of our classroom and school.  The video here is an example of how we start out early in the school year.  I usually present with them to help them get started and to give them a crutch to lean on.  They know if they struggle I will bail them out, so to speak and help smooth it out.

As the school year progresses the students take over more and more of the presentation.  Eventually all I do is introduce them and wait for the end of the presentation to help them answer questions (those specific to the teaching of the class).  The students answer the questions about the project.

As I stated at the beginning this is the first time I've ever edited video.  My students normally do it.  But, this time I did it all on my own using windows movie maker.  I'm looking forward to our future 2 Minute Moment Projects.  I have some great video that I would like to edit going forward and I feel I can eventually make a compelling video of our project.

Imaginative Bridges - 2

The graphics and photography module has a direct bridge towards creating a Compelling Educational Experience in the classroom.  In today's mass produced education we are forced to do more with less and to cover a curriculum that is sometimes a "Mile Wide and an Inch Deep."  In such an environment it is hard to do much more than gloss over or introduce a topic.  In this module we looked at focusing on one object, simplifying and/or getting rid of the clutter.

In the photography module we also changed the photographs perspective to create interest.  Changing the camera angle or the photographers position often created a better photograph.  The same can hold true in the classroom.  Rather than directing from the front of the classroom to a row of desks we can change the arrangement of the room to get different interactions from our students.  We can move our selves into the class and work with teams of students to discover new things rather than lecture from the front filling our students with lots of testable facts.

Working together and creating new knowledge, a knowledge that comes from discovery as opposed to lecture can help to create a lasting knowledge and understanding that students may never forget.

Narrowing down our curriculum to one deeply involved topic that students are allowed to explore, feel, experience and then learn may create the life long learners we are all hoping to develop.  Rather than talk about history and historians let the students become historians and explore a topic in depth.  Rather than lecture about biology let the students become the biologist and study a life form that interests them in depth.

It soon becomes more than the topic itself.  It becomes a journey of learning and exploration.  My class started out wanting to build an underwater robot or ROV.  That has expanded into buiding an ROV to compete against others.   It then evolved into building and operating an ROV to look for airplanes underwater and then it evolved into using the ROV to not only find the missing airplanes, but to find the missing aircrews.  And, along with that they learn history, geopolitics of the Pacific and about oceanography and geography. Not to mention fundraising, marketing and budgeting.


Above are my new students and Rev. Lew Towler a US Navy veteran of WWII and Peleliu.  He will be traveling with my students and I this spring to the Republic of Palau as we search for another missing aircraft.  Lew wants to go with the students as we tour the Battlefield on Peleliu.  Lew landed there with the SEABEES on D+3, or September 18, 1944 and spent the next year there as part of a SEABEE Battalion working on the airfield and port facilities to support the Marines ashore.

Photography Module Project


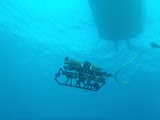
This is a digital photo of my students ROV underneath our dive boat.  This photo involves a change in camera position and perspective.  None of my students are divers so their view of the ROV is on the surface, on the surface while putting it in the water or while snorkeling above it.  I took this picture from underneath the ROV about 20' down using a GoPro camera.

XXXXXXXXXXXXXXXXXXXXXXXXXXXXXXXXXXXXXXXXXXXXXXXXXXXXXXXXXXX

This view is from the surface as my students are lowering the ROV into the water.


Below is the last surface view my students have of their ROV as it begins its underwater mission.  Students use the view from the ROV's video cameras to explore the ocean below them.


Once again I feel the first picture is more compelling do to a change in camera position.  The view from under the surface of the ocean.  A view that most people are unable to obtain.  The biggest problem I have with this project is getting people to believe that high school students have built an ROV, traveled 8,000 miles to the other side of the world, deployed the ROV in the Ocean and actually found a missing Marine Corps F4U Corsair fighter that went down in 1944.

The underwater views are an important part of the story because they show that the ROV actually worked.
I have two better photos to illustrate this.   While I took the three photos above I did not take the next two.


Both pictures are of the same Corsair we found and take on the same day and about at the same time.  The top one we call the money shot.  The bottom photo is from a GoPro camera mounted on the students ROV in place of an underwater video camera that was damaged on the previous dive.  Once again these two photos involve a change in position and perspective.  The thing that makes the first photo more compelling is that the photo includes the ROV, the corsair and the diver. The top photo was taken at a shallower depth and we pulled the photo back into Photoshop and added some color to the ROV and took out a little bit of the blue green from the water.  The change of perspective allowed us to highlight our ROV above the crash and to prove that we were there.

Both photos were taken with GoPro Cameras underwater. The top photo was taken by another team member Derek Abbey.(Corsair and ROV).


Monday, January 14, 2013

Imaginative Bridges - 1


Forms:

The aesthetic form that most closely fits what I do in the classroom is a product.  Something "made,"  I can think of no better way to show that you truly understand robotics, then to make a robot.  But, I have found that it is more than the robot itself.  It is the total experience.  At first my advanced underwater robotics class was all about making an underwater robot or ROV capable of diving to 125' in saltwater and video taping airplanes that crashed during WWII.  Now it is much more.  It is a year long experience where students raise funds, promote the project. Speak to audiences outside the school and communicate directly with professionals outside of school.  People from the government, academia, industry and the military.  Students spend a lot of time outside of scheduled class time working on this project and look for ways to get out of other classes in school to work on the project.